Polaris Mutt Mod

skiroule

Well-known member
I’ve flip-flopped more times than I can count about doing another “ground-up” project but for some time I’ve been thinking about a couple of projects that I’d really like to attempt.

This project is one that I’ve been mulling over. I’m calling it a “Mutt Mod” but in the end I think it will be more mutt than mod. The reason I say this is that if the end product goes as planned, it will be a combination of several sled parent years. The mod side will be pretty mild and nothing that hasn’t been done before but it will all be new to me.

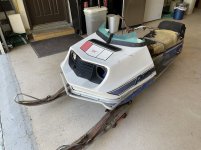
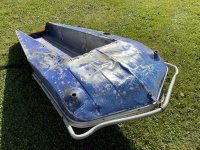
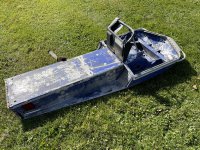
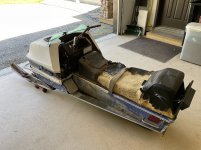
All along I’ve had a 73 TX in mind as a perfect sled for the mutt project and I managed to find a candidate this summer. Between the normal damage, missing parts, and things I’d like to change, it will require me to learn at least one or two new skills.

As with pretty much anything I’ve done, this project will be a slow roll. I do hope I can get it together before the snow is gone next spring, but as always, nothing is guaranteed.

Over the winter I hope that some of you will share my interest, or at least find it mildly entertaining.

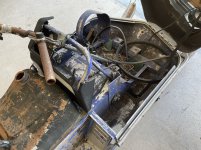
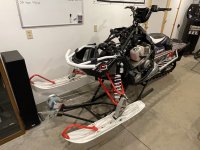
Here’s where we start:
IMG_1587_1.jpg

IMG_1590_1.jpg

IMG_1585_1.jpg
 

mezz

Well-known member
It looks like you have some good bones to work with & as usual, you will have your work cut out for you. That is what makes your projects so interesting to follow from start to finish as the end result is always outstanding. I am looking forward to it.
 

skiroule

Well-known member
I’m glad you guys have confidence because it lets me feed off that confidence to launch into this latest old iron resurrection.

I’m still in summer fishing/lawn mowing/morning coffee and evening brewski on the deck mode, but I doubt there’s a day I don’t think about this project. For whatever reason, this one seems special and different. Maybe because of the challenges I think it will present.

I am trying to multi-task a little and get things moving but it won’t be too long before I can get more serious. I’m hoping to include a ton of photos as time goes on which, I think, tell the story best.
 

skiroule

Well-known member
Thanks, hopefully the project ends up as I'm imagining it. I'm definitely a little antsy to start getting things set up in the shop, but before a lot of that can happen, this freeloader has to give up its space.

Have to love the late model design, all this to replace the Bendix drive for the starter.
IMG_1704_1.jpg
 

skiroule

Well-known member
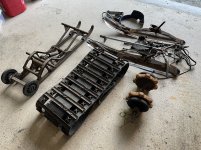
There wasn’t much to the sled “deconstruction” and it went pretty smoothly. One spindle was a little stubborn and, of course, three suspension bolts came out easily and the head on the fourth stripped out. Had to resort to my hack trick of driving a slightly smaller metric socket on it – came right out.
IMG_1657_1.jpg

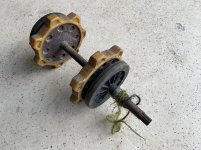
This made me laugh. I guess it’s a requirement that all vintage driveshafts have a few wraps of baler twine. I’m not sure how brittle the drivers are but they have almost no wear. Will probably pound on them a little to see if they will take the load.
IMG_1653_1.jpg
 

kirk600

Active member
You need to share your energy secrets Kelly! I have nothing but respect for you and your can do attitude, and what better way to spend the time than making something fun to play with.

Looking forward to updates
 

skiroule

Well-known member
Hey Kirk, good to hear from you. Not sure about the energy level thing, there are days…. It probably helps that I only work a couple of days a week, leaves a lot of time for other activities.

I’m sure we’ll be talking, I will know I will need some expert mechanical advice (and maybe even a little help).
 

kirk600

Active member
Well you're working, and working on projects, I'm just working and getting farther behind. I do feel a little break is coming soon, work and weather wise! What's your plan for an engine on the new project Kelly?
 

euphoric1

Well-known member
There wasn’t much to the sled “deconstruction” and it went pretty smoothly. One spindle was a little stubborn and, of course, three suspension bolts came out easily and the head on the fourth stripped out. Had to resort to my hack trick of driving a slightly smaller metric socket on it – came right out.
View attachment 67395

This made me laugh. I guess it’s a requirement that all vintage driveshafts have a few wraps of baler twine. I’m not sure how brittle the drivers are but they have almost no wear. Will probably pound on them a little to see if they will take the load.
View attachment 67396
My how things have changed!! I see we have some "claws" in the cleats for that...added extra traction
 

skiroule

Well-known member
Well you're working, and working on projects, I'm just working and getting farther behind. I do feel a little break is coming soon, work and weather wise! What's your plan for an engine on the new project Kelly?
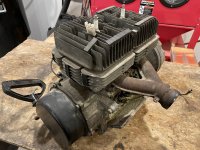
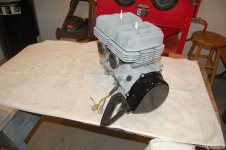
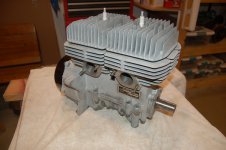
Good question Kirk. If things go according to plan (questionable), I’m going to use this mill. It’s a 340 “Big Fin” motor out of a 78 TX. They might have bumped up the HP a little from the 73 version but I’m not sure. Even though it is the same displacement as the original, there are a couple of significant differences: First, the top end is physically quite a bit larger due to the much bigger cooling fins and second, this engine runs a CDI ignition so I will have to use the 78 CDI box and adapt the 78 wiring harness.
IMG_1699_1.jpg


My how things have changed!! I see we have some "claws" in the cleats for that...added extra traction
Yeah, it’s got a bunch of claws, which I suspect have contributed to a lot of broken cleats. According to my unofficial count, it has 17 good cleats and 20 broken ones. I’ll have my work cut out for me on the track.

Just some boring stuff going on now, doing a lot of sandblasting. Trying to get my outside sandblasting of the parts that won’t fit in my cabinet done before the weather heads south.
 

skiroule

Well-known member
Sometimes you literally have to beat the bushes in search of parts. My brother’s Sears Sportster (aka Polaris Charger), abandoned many years ago, actually provided a couple of key parts that will be put to good use.

IMG_1726_1.jpg
 

kirk600

Active member
Kelly,
It's always great when you can find the right parts! Do you plan on keeping it a cleated track, or are you considering a rubber track conversion? It should be fun with the newer mill for power!
I have heard that the sears models have aluminum tunnels, whereas the Polaris had steel. Can you verify that on your brother's sears sportster?
 

skiroule

Well-known member
It’s probably not the smartest move but I’m going to stay with the original cleated track. It will be a lot of work to get it back into shape but it’s simple and I guess that fits me.

I’ll have to take another look at the Sportster next time I’m out there but I’m pretty sure it has a steel tunnel. When he got the sled new it was a 440 free air, which was their “high performance” model. He eventually scored a piston so the engine was replaced with a fan cooled version. On another occasion, he barrel-rolled it on an icy road so it ended up with a Polaris Charger hood. A lot of wild times on that sled.
 

skiroule

Well-known member
The chassis is somewhat cleaner now and I sandblasted all of the steel rivets that won’t get replaced. The next step will be to strip all of the remaining paint, then I will be spending a little time taking out dents. I also need to figure out how to fabricate a new piece for the end of the tunnel. The original is too far gone to be saved.

IMG_1714_1.jpg

IMG_1721_1.jpg
 

skiroule

Well-known member
A lot of guys are still out there throwing a line in the water but the soft water fishing is over for me so it’s time to start dealing with the multi-page list of projects that need to get done on the home front.

It may not be the best idea but my plan is to do some time-slicing on activities so I can fit in some work on the mutt. I took advantage of the unusually nice October weather yesterday to do what I hope is the last of the outdoor blasting.

Part of the engine detailing was to get it bead blasted. This was my first attempt at glass bead blasting and I guess it came out OK. I probably could have spent a little more time prepping the engine before blasting it because the beads aren’t terribly abrasive but it should be fine for my purposes. I will replace the carb boots and probably the seals before it is eventually fired up. I know I’m biased but I think these 70’s free air motors are some of the coolest looking engines ever put in a sled.
DSC_0186_1.jpg

DSC_0191_1.jpg

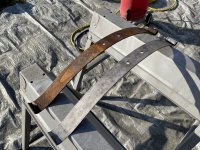
Speaking of blasting, my inexpensive Harbor Freight hopper system that I use outdoors is not as aggressive as the big commercial units but sometimes that isn't a bad thing. It works well enough to remove the scale and it should only take a light sanding to get the parts ready for painting. This shot gives you some idea of what the bigger parts look like before and after blasting.
IMG_1757_1.jpg
 
Top