Well I picked up the clutch alignment tool yesterday. It is well with in specification. It is only out by .020" on the back side of the secondary. So it looks like I have to shim the motor to get the correct shaft center to center distance. I'm not sure if the center to center distance being to long could cause the belt to break but I have some time so I will make sure to bring that to 11.5". I will also tear the clutches down and inspect them to see if I can find anything wrong with them.
Which tool do you have?
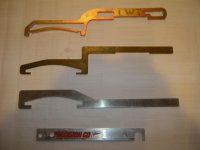
The POLARIS/SPX tool has already approx .075" of "kick" built into it already.
The SLP tool is "straight"
I have a 2007 DRAGON 700
In order to straighten it out, you can NOT shim it like the edges
The only way to correct it is too slot the engine bracket holes (directly under the engine)
I have a thread posted at the top of the IQ section on
www.hardcoresledder.com with pix
TECH TIPS FOR 600/700/800 CFI's and BEST BANG for the BUCK:
BEST BANG FOR THE BUCK MOD
Get a $25.00 annual subscription from DYNOTECH
www.dynotechresearch.com
PC-5 from DYNOTECH Jim, best $365.00 you'll spend, (585) 993-2777 (
www.dynotechresearch.com) Add the AUTO-TUNE option for $250.00 more.
96 or More studs, traction is where it's at, all the power/clutching in the world is useless if you're not coupled to the ground.
almost FREE MODS
PRIMARY CLUTCH:
1) Check your belt to primary sheave side clearance, should be .010" to .015" w/NEW belt, mine was .070" from the factory.
2) Install a new primary clutch spring @ the start of every season. (approx $31.00)
SECONDARYY
1) Install (1) DELRIN washer under the spring cup in your secondary clutch (less than $5.00)
2) Install a new secondary clutch spring @ the beginning of every season. (approx $25.00)
BOTH PRIMARY & SECONDARY
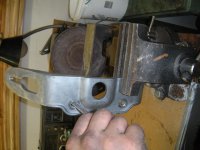
1) Align your clutches (center to center 11.5" exactly, and check for engine "crooked", picture posted below of how the alignment tool SHOULD contact the front and rear of the secondary) Check this with the SLP or TEAM tool, as the Genuine GOLD Plated POLARIS tool has approx .070" of built in "kick'
A) WITH SLP PUSH LIMITER: 0 to .020" air gap @ the rear of the secondary
B) WITHOUT SLP push limiter: .020" to .040" air gap @ the rear of the secondary
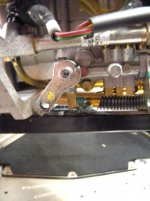
You may have to slot the engine bracket(s) to case engine case holes get it perfect. These are the holes located directly BELOW the engine itself. On mine & my bud's 07 D7 we had to slot the Mag side engine bracket almost 3/8" to "straighten" things out. Picture of the Mag side slotted engine bracket posted below, do this step ONLY if necessary. DO NOT SLOT THE ENGINE TO RUBBER MOTOR MOUNT HOLES. Double check your c/c measurement after you get the engine "straight" and then slot both engine brackets an equal amount (if necessary) to obtain 11.5" center to center exactly.
2) Check and adjust clutch offset, do this AFTER the above has been completed. This is E-Z, just adjust shims on the secondary shaft until the secondary touches the alignment bar. You want approx .030" of free play as well.
3) Lightly sand both primary and secondary clutches w/180 grit perpendicular to the way the belt rides and wipe down w/lacquer thinner.
4) Mark the Primary clutch sheave with a fat black marker, and make a few full throttle 1/4 mile runs and see how high the belt rides up, see pic posted below.
5) Wash/scrub (plastic bristle brush) your BRAND NEW belt w/soap & hot water, and let dry overnight, sounds weird, but it removes the "mold release" compound that would otherwise would get smeared all over your nice clean clutches.
T.P.S. CHECKING & RE-SETTING PROCEDURE (easier than you think, don't just trust the dealer to "check" this with the Digital Wrench)
Check/reset your T.P.S. Pretty E-Z to do, build a tester for $10. Don't overlook this! Log onto SnoWest, IQ section @ the top, there's a "sticky" INCREASING YOUR IQ. All the info is there. Then go to the Polaris 900 section, there's a video that walks you through the process. Two things to keep in mind, the CFI's T.P.S. get set WITH THE THROTTLE BLADES FULLY CLOSED!! Set it @ .70 volts +/- .01 for the 600/700/800 C.F.I.) After that, then open the idle speed screw to the specified setting (.94 -.95 volts +/- .01 but this varies with model). Most dealers/digital wrench don't do this. Then, using an old style analog voltmeter, open and close the throttle gradually, the needle should move SMOOOOOTHLY, an erratic reading indicates a faulty T.P.S. sensor and must be replaced.
For those that don't want to build a T.P.S. tester, I just purchased a T.P.S. tester (manufactured by KENT-MOORE / SPX) from my local POLARIS dealer for $48.76
PART # 2201519-A. Comes with the pigtail, 2 plug ends, 5 volt regulator, harness. All you need then is a 9-volt battery and a voltmeter. Even with this set-up you need to verify 5.00 volts EXACTLY before starting to test the T.P.S. Works on sleds, ATV's & Rangers
OTHER: OIL PUMP CALIBRATION, CHAIN TENSION, TRACK TENSION, ENGINE LIMITER, OTHER PERFORMANCE TIPS, & MAINTENANCE:
1) Check your oil pump calibration , mine was 38:1 (that's a little more than 1 quart of oil per 10 gallons fuel) stock, 1 1/4 to 1 1/2 turns on the adjuster jam nuts and it's @ 57:1 now (22 TO 23 OUNCES OF OIL PER 10 GALLONS OF GAS) for the last 1200+ miles, marks are suppose to align @ 3:00 position as a starting point. RED dot on the case has a short horizontal mark on it as does the oil pump arm. See picture posted below.
2) Check your chain tension in the chain-case, adjust it to where the chain will almost touch the backside of the case w/finger pressure. While you're in the chain-case place a metal straight edge onto the sprockets to make sure they're EXACTLY in line. Shim with thin 1" I.D. shims available from automotive cylinder head shops, used as valve spring shims. Same shims also fit onto the secondary shaft for getting the offset "dialed in"
3) Run your track looser that stock Polaris specs, approx 1" to 1 1/2" sag just sitting there on the stand.
4) Install a SLP "push arm" engine limiter on the MAG side, approx $40.00, 20 minute installation SLP part # 23-63, picture posted below.
5) Place a small piece of duct tape over your headlight adjuster knob, prevents, water, snow, ice from being ingested into your engine.
6) Remove the air-box and wipe the seam area down with lacquer thinner and duct tape the seam, prevents Kevlar belt dust from being ingested into your engine
7) Plug the exhaust purge hoses coming off the exhaust valves, this makes it like the 2001-2005 set-ups and definitely improves acceleration
8) Install a simple 1/4" shutoff (available @ hardware stores) onto the P.T.O. head where the coolant line heats up the throttle bodies, this comes stock on 2007 Ski-Doo 800's and other models
9) Clean your exhaust valves AND bores, their dirtier and gummier than you think. While you're there check the bellows for small rips and tears.
10) Check your black rubber throttle body adapters because they have a habit of de-laminating/cracking causing air leaks and burn downs. Polaris has since changed part#'s to a "new improved" version
SKI's
1) Check ski alignment, 1/8" toe out is preferred
2) Check out
www.bergstromskis.com Very informative site, especially the info on shimming the stock skis to eliminate the "darting" issue instead of purchasing a $350.00 pair of skis
DEBATE-ABLE
SLP Big Air Kit and Flo-Rites, ($42.95 + (4) X $19.95= approx $122.00) E-Z to install , I just didn't notice any difference that's all.
WASTE OF $$$$$ I.M.O.
1) V-Force reeds, NO noticeable improvement, V-force's were definitely NOT worth the $258.00 and a lot of installation time!! In addition, several V-Force users have reported failures after just one season as the CFI sleds run "drier" than carbed sleds/
2) Aftermarket silencers. Even with the weight reduction, acceleration is slower. And for those of you who think it's "cool", consider this next time you come across a "closed trail" sign. LOUD exhaust closes trails, period.
3) Boost bottles (Carbed 600 IQ's)
4) 8" rear wheel kits
HOPE THIS HELPS!!