My Third (and Fourth) vintage sled projects..... 1979 Polaris TXL 340 @ Centurion 500

kirk600

Active member
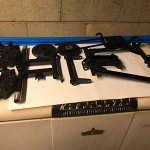
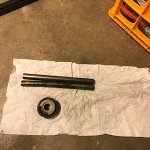
Well I got a little bit more done this week. Painted handle bars, installed carbs, fuel pump and carb flanges. Snaked the flange bolts into the tunnel by taping them to a long zip-tie and pulling up! Works like a charm!!! New speed nuts hold them in place. I had to cut the original ones off and also had to replace the tank bracket as it was rusted beyond repair. Hope you enjoy the updates and see the pictures.
https://kirksvintagepolaris.blogspot.com/2021/04/my-vintage-polaris.html?m=1
 

euphoric1

Well-known member
kirk600, just curious, what's your method of choice to clean those gummy carburetors? I use ultra sonic but was curious what you use
 

kirk600

Active member
EC717176-135B-4B71-8E2C-9DBD4B149F6C.jpeg I use Berryman B12 carb choke and throttle body cleaner.....in a aerosol can, and a tooth brush or q-tips. It's the best carb cleaner I have found and it's available at many parts stores.
Some carbs might take a soak but even as nasty as these were they cleaned up great in a few applications.... probably 20-30 minutes total each carb.
 
Last edited:

kirk600

Active member
So here's a little update for those that are watching. I appreciate your support and hope that all of you have a great weekend. First a little story.......
I worked with a old guy years ago at a local service station, and he said something about common hand tools that has stuck with me ever since. He started out saying is that a positive or a negative whenever you were working on a customers car. You usually had a tool in your hand, and I always thought he was asking if the job was rewarding or a bummer of a job. If the customer was around I would always say it was positive as I am helping someone with a job so they can get back to work or whatever they need the car for. He would just smile and walk away...... same response if the customer was not around and I said it was a negative job......this banter went on for over a year, not every time but frequently enough that I got curious what his intentions were.
One day I said Steve what kind of job he was working on, a positive or a negative? He said that depends on the tool you need for the job. Every positive job requires a Phillips screwdriver and a negative job requires a flat blade screwdriver..

It is the screwdriver head and he told me a customer years ago didn't know how to ask for the right tool except by the shape of the screw head.. negative is a straight line and positive is a plus symbol..
Stay positive my friends!!!!!

So for the update I had to grab my negative screwdriver and attempt to remove the windshield. It didn't go as planned as I stripped out multiple screw heads and I had to get my dremel grinder out to cut them off. Did this from underneath the hood so I would not damage the finish on top where everyone could see my mistakes! Wend slow and spraying water on bolts to keep the heat down.Went fairly well and got it removed in one piece without any extra holes showing. Got the fuel filter and lines back on and cleaned out the air box now I need to determine is it supposed to be glued together or will the fasteners that bolt it to the chassis keep it in place? I am pretty sure I need to glue it back together.

That's all that I have for this week folks, take care
 

kirk600

Active member
https://kirksvintagepolaris.blogspot.com/2021/04/my-vintage-polaris.html?m=1

I forgot to add the link for pictures. I got instructions from Kelly a few months ago but I don't know how to find the image codes on my blogger pictures to bring them over here. If anyone has some idea how to do this with a Apple Phone please let me know. Something about right click image is my road block

Thanks for following along,
Kirk
This is as close as I can get.......
https://1.bp.blogspot.com/-U2CuCOb1...300/C9FDEA4C-DCA7-49D5-B27A-E75E8D75F08E.jpeg
 
Last edited:

skiroule

Well-known member
Yeah Kirk, I had my problems with accidentally melting plastic when working with windshield screws. Your windshield looks to be in excellent shape, well worth saving.

My I-Phone skills are limited but I tried this with just a random image on the internet:

You probably already are doing this but I used two browser windows, one for the source of the image and a second for the JD discussion board.

1. In one browser window, press and hold on the image (in this case in your blogger).
2. Select Copy from the drop down that appears.
3. In the JD browser window select the insert Image icon in your thread post.
4. Select From URL in the pop up, highlight the address window, and select Paste and Done.
5. Do not forget to uncheck the archive local copy box.

This worked fine for me and it inserted the image nicely but keep in mind I am using the Standard editor on JD, not the enhanced editor.

I would recommend resizing your photo in the blogger to Extra Large.

It looks like a lot of messing around but it is really pretty fast if you are good with a smart phone (I am not).

I might try this again for real in the Namesake thread later to make sure I have the instructions right.


skiroule

Well-known member
Kirk, This is the best I could do with my I-Phone (so far anyway). I copied one of the images from your blog. Your blogger setup is a little different than mine but it worked with one catch, the image does not seem to be viewable unless you are logged in. I do not know why this is happening (yet anyway). It might be that the phone copy just works differently than a laptop. I think the image could be sized bigger in your blog and ir would produce a bigger image here. It looks like it might be the smallest (default) size. I might try to look into the copy process a little more. BTW I loved the positive/negative story - never thought of scewdrivers that way.
32ACA6B9-E071-4565-BDFA-875286DC14E5.jpeg
 
Last edited:

kirk600

Active member
Well that gives me something else to try Kelly, thanks again! We have to keep learning this new technology whether we want to or not. Kind of like EFI when carbs work just fine........
Hope you are improving with each day in therapy, snow isn't too far off Kelly. I have to get this TXL back together so I can start on the Centurion.
Did find a few issues with the slide rails on the TXL, hopefully my welder can fix them for me. Otherwise it's going to get a newer Indy skid.
 

kirk600

Active member
47AF7A05-6A69-44C0-97B7-F25ECDFB977D.jpeg 580090D0-1760-4797-B16C-1546C07B1522.jpg

I did increase the size of my pictures in the blogger

Success! Thanks Kelly for the help once again
 
Last edited:

skiroule

Well-known member
Glad you got it working, no worries about failed uploads anymore (a problem I have never been able to solve - most people seem to do it with no problems). The tank looks great, paint is a dead ringer for stock. If you wind up with an Indy suspension, I will be real curious about the general year you used. I assume on the TXL it is literally a bolt-in, no driver or track changes needed.
 

kirk600

Active member
Kelly, you are correct I will not have to change the track or drivers, as long as I keep it 121 inch. If I recall any Indy skid up until and including 1990 is a bolt in swap. I sure hope I can get these rails fixed as 1979 is a one year only design..... I will have to get some pictures from the other thread and bring them over here with pictures of my current skid......
 

skiroule

Well-known member
I am not familiar with that particular suspension but I seem to recall that even the earlier TXLs had a totally different suspension than the TXs. Since it is a on-off setup, I agree that you should save it if you can. Once again, it is a little piece of sledding history.
 

kirk600

Active member
Yes I agree with you Kelly, I want to keep them as original as I can. It appears that this year had brackets bolted and riveted to the slide rails, and the following year they were cast as one piece. I am sure it was to reduce cost, both in materials and labor to assemble. I have included pictures from my last TXL suspension I rebuilt, and a picture of my current TXL. I looked at the centurion and it appears all is good on that sled.

1A919870-105B-4056-A0A5-2BC5ADBAB097.jpg 38C86379-867B-4829-B83D-D1CE58DC6090.jpeg
 

kirk600

Active member
3F0BF595-A8FA-4E06-9B8A-28DA7556E4C2.jpg A72B7076-92D7-4E9B-B417-315BC8B4C708.jpg Well today I removed the rear skid and disassembled it, I also removed the driveshaft and track. One of the drivers is pretty chewed up from something hitting it. I might have a spare around here.....
 
Last edited:

kirk600

Active member
F2D2C7D1-D655-46B3-8611-5A71047A0231.jpg 4B1C12FE-FFF4-4C57-B94B-D9EC450C85C1.jpg Got some ski skins for the TXL, so after I sandblasted them and painted them midnight blue, it was time to install them. I used a set of mid 90's Indy wear rods which required me to drill the skis for the correct bolt pattern. I think they turned out good considering the skis were repaired do to holes wore through.......
 
Last edited:

kirk600

Active member
View attachment 63359 View attachment 63358 Got some ski skins for the TXL, so after I sandblasted them and painted them midnight blue, it was time to install them. I used a set of mid 90's Indy wear rods which required me to drill the skis for the correct bolt pattern. I think they turned out good considering the skis were repaired do to holes wore through.......
Well the ski's are done, and started to work on the seat. I had cut a couple boards a few months ago and finally started to work on one. I sealed the wood, as I didn't use treated lumber. I went through a couple tries pulling the material tighter each time. Probably have to do it once more but it's looking good so far. After I finish pulling it tight I will finish stapling it and cut off the excess material and install the trunk door C651508E-2EE5-41F3-8FB4-D8FE0A936A9E.jpeg 2446B041-24B9-4B12-9128-D9D60460176B.jpeg EC8848F3-25E0-41CA-B85F-7FB89CCE00DA.jpeg C651508E-2EE5-41F3-8FB4-D8FE0A936A9E.jpeg
 

kirk600

Active member
I am still waiting for my welder to repair the slide rails, I have repacked or replaced the idler wheel bearings and I had to replace one bearing sleeve. The original sleeves, or inserts were made of aluminum...... the new ones are plastic. I also had to have one shaft replaced as it was bent. I am blessed with the fact that we have a few old school one man machine shops still around. Making a couple shafts and drilling and tapping them is a 24-48 hour turnaround. I tried to find the shaft through Polaris but it wasn't available....
 

Attachments

  • E8643A17-E59A-411B-84CF-4F08CD33C65D.jpeg
    E8643A17-E59A-411B-84CF-4F08CD33C65D.jpeg
    35.6 KB · Views: 9
  • 55C4F3B8-7D38-47BF-9363-1B6E65B8B61A.jpeg
    55C4F3B8-7D38-47BF-9363-1B6E65B8B61A.jpeg
    40.6 KB · Views: 9
  • D8BCB480-2E2A-4EBD-82A2-B41A811E7F79.jpeg
    D8BCB480-2E2A-4EBD-82A2-B41A811E7F79.jpeg
    30 KB · Views: 8
  • C5DC8270-30FC-4517-B314-A6766DE06576.jpeg
    C5DC8270-30FC-4517-B314-A6766DE06576.jpeg
    23.7 KB · Views: 7
  • E53C31CF-2D9E-46D5-B1D0-838F0DB407EB.jpeg
    E53C31CF-2D9E-46D5-B1D0-838F0DB407EB.jpeg
    30.1 KB · Views: 9
Top