2009 arctic cat crossfire power valve problems

ridehard

New member
2009 arctic cat crossfire power valve problems STM power valves

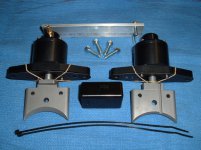
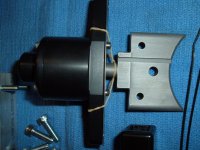
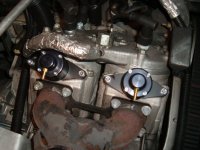
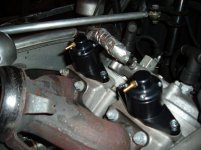
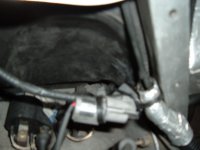
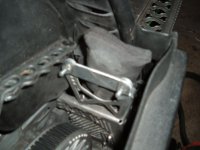
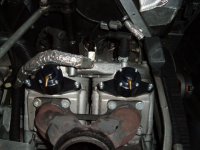
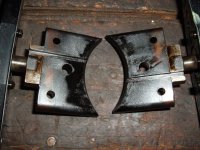
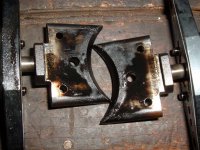
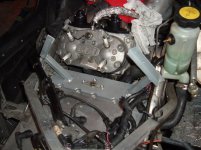
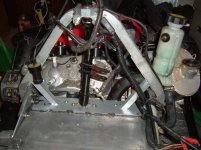
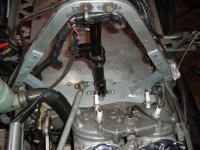
I got a 2009 Arctic cat crossfire 800. I have had my cables lock up on my power valves. The cost for them is $51 each. Looking at all the threads on the internet i could also soon have actuator motor issues and this is $380 new. So i have decided to go with the STM power valves from Supreme tool and machine. These will get rid of the actuator motor and the cables. I was wondering if anyone has tried these valves and how they worked for you?
 
Last edited:

thebreeze

Member
Lots of guys run them on snowest, and most everything I have seen has been positive. Powervalve cables are definitely a wear item on the cat's, and are overlooked by a lot of people.
 

ridehard

New member
Pistion style power valves

Most of the talk is on the bellow type power valve from STM. Does anyone have feedback on the piston stlye power valves from STM.
 

ridehard

New member
Supreme Tool and Machine Power valves STM

My STM power valves arrived today and they will be on tomorrow. The valves look to be made very well and the quality is great. No sharp edges, the black coating is even and looks good. Machined surfaces have a nice finish. The kit includes the valves assembled completely, the gaskets, the chip to plug into the wire that went to the servo motor, mounting bolts, spanner wrench, 2 wire ties and instructions on how to maintain them. It recommends disassembly and cleaning every 2000 miles. I guess that is better than adjusting cables, I hate adjusting cables had enough of that with my old 95 XCR 3 carbs 3 cables plus the oiler. Thanks for rack throttle bodies and a solid link going to the oiler we have now only have one cable. I will report back with the install and how they performed once I get it done. Here are some pictures of what $480 looks like.:cool:
 

Attachments

  • STM power valves 002.jpg
    STM power valves 002.jpg
    96.1 KB · Views: 61
  • STM power valves 004.jpg
    STM power valves 004.jpg
    95.6 KB · Views: 43

ridehard

New member
STM power valves installed

I got the valves installed and like they say it is install and go which I did. I had to oil the shafts of the valves that's it. They bolted up easy and had no clearance problems. I was able to get the wires going to the servo motor moved to behind the PTO spark plug and wire tied it to the wires there. I plugged in the Black box they sent me to plug into and I was done. I now have a great spot to keep my tool kit instead of under the seat it goes right where the servo motor used to sit. I rarely need my tools It is a cat but it is nice to have them handy. I took it out for a ride and it seem a little sluggish off bottom but then took off like a raped ape. I am going to run it like this to let the springs break in and hopefully the low end sluggish goes away if not they have spring sets you can buy to tune it to open up at different pressures. Earlier in the season I installed a BDX no slop steering stem bearing kit and with 175 miles on this year it working very good but it is still to early to tell the durability. It did remove the slop in my steering stem. The BDX foot well bar kit was also installed. I can now lock my feet in the foot wells something I could not do before. Sometimes this keeps me on the sled which is a good thing. I really like the foot wells. Also picked up some vents at haydays for above the speedo and in the dash. Last year the speedo got a bunch of moisture in from snow melting on the pipe and took out the speedo.$300 not good. I figured all this steam had no place to go except in the speedo. Earlier this year I got into some powder and got alot of snow on the hood and on the pipe it melted and I was impressed at how much steam was coming out of the vents. I am sure this will help with the moisture and heat. I installed a vent in front of the clutch to keep it cooler and get better belt life. Currently I get 1000 miles per belt. I will see if I can even get a 1000 miles on this year. I will report back later in the season as to how the aftermarket goodies are holding up.
 

Attachments

  • stm install 001.jpg
    stm install 001.jpg
    89.7 KB · Views: 47
  • stm install 002.jpg
    stm install 002.jpg
    87.7 KB · Views: 46
  • stm install 003.jpg
    stm install 003.jpg
    80.1 KB · Views: 45
  • stm install 004.jpg
    stm install 004.jpg
    85.8 KB · Views: 48
  • stm install 005.jpg
    stm install 005.jpg
    90.5 KB · Views: 46
Last edited:

ridehard

New member
Went to Dane county this weekend and put on 280 miles. The trails were good in the morning and beat by night time. The sled ran great and the low end sluggishness went away, maybe the computer had to adjust itself. STM power valves are great and do what they say. No real performance gain but realiability is what I am looking for.
 

ridehard

New member
Power Valve condition after 280 miles using Mystic full synthetic

Pulled the power valves to clean them after 280 miles this is what they looked like. About the same as the stock valves would have been. Some oil on them and some crusted carbon.
 

Attachments

  • power valves 004.jpg
    power valves 004.jpg
    97.1 KB · Views: 28
  • power valves 005.jpg
    power valves 005.jpg
    98.2 KB · Views: 25

ridehard

New member
Diamond Drive drive shaft to long bearing problems

Decided to pull the diamond drive and clean and inspect it since we have no snow to ride. Glad I did. The center bearing on the lower shaft in the diamond drive was in pieces and missing balls when I took it out. Last year I installed the double roller 5203 in there and figured I was good. But the problem is not the bearing it is the drive shaft. The drive shaft (drives the track)was to long putting alot of side pressure on the bearings once the assembly was together. Arctic Cat had some quality issues with the tunnel width. Some were wider some were narrow. Mine was narrow so when the drive shaft was tightened up it was pushing outward putting great force on the bearing I kept having problems with. My drive shaft believe it or not was .168 to wide for my tunnel. I machined .120 off the shaft to narrow it up. half on one end and half on the other end. I left .048 inch pressure. the tunnel should flex that much. I first measured my bearing and gear stacks up then measured the inside dimension on the gearcase. The upper shaft has .040 side pressure meaning when I put the gear case cover on there is a .040 gap until I tighten the bolts on the cover. The lower shaft had .024 clearance until the drive shaft is bolted up to the brake calipher housing. so with the diamond drive installed and the drive shaft bolted to it, it would push the brake calipher mounting surface out from the tunnel .168 of an inch. So I machined the shaft and purchased SKF bearings for all the bearings on the shaft. I would think this would make the bearings last so much longer. The 5203 bearing had about 1400 miles on it when I took it out. I do not believe It would have made it another 50 miles on that bearing.
 

ezra

Well-known member
I have sent a few shafts to bdx over the yrs he machines off the material from the brake side so it will slid just that little extra in to the bearings of the break side.
he only charges me 35 bucks
 

ezra

Well-known member
and BTW as u found out stm makes some high quality stuff.
I have helped build a few drag sleds that used the STM diamond drive to chain and gear conversion and these things are pushing more HP than allot of performance cars out there with no issues in 3 yrs
 

ridehard

New member
After I got all my measurements and figured what I needed to do I did call BDX to confirm what I needed to do and he said there normal amount to remove is between .075 to .100. He said they remove it from brake side because of the easy set up on the machine. I work in and have access to all kinds of machines so I just do the work myself. I removed stock from both ends to center the drives in the center of the tunnel. Now I found a crack where the steering stem mounts to the tunnel, what next!!!!! now I need to do some welding and reinforcing.
 

ezra

Well-known member
no there is a guy on I think snow west or BCR who sells a fix it kit for that issue looks like a nice set up.
think the guy is out of AK.
he makes up a batch every yr and gets them powder coated under a hundred I think.
 

ridehard

New member
Crossfire M series Steering stem fix. XXX-Mods M-right support

Ezra you are the man!!!! That is exactly what I am looking for. I just purchased it and hope to have it by next weekend. That will also give my steering stem more support, something else I was looking for. Thanks again for the link to the part I think you saved me some grief. Mine is just cracked slightly so hopefully this will save it.
 

ridehard

New member
M-Rite support

Got my M-rite support bracket today. Wow only took 4 days from Washington State to Wisconsin. Looks to be a very nicely made piece. Has good instructions and all mounting hardware. Instructions say to remaove gas tank, pipe and steering hoop. I will let you know how the install goes. The bottom plate is 1/4 inch thick then were it is milled it is 3/16 inch thick. the angle iron is 1/8 inch thick. Nice welds on item. m-rite 001.jpg m-rite 002.jpg
 

ridehard

New member
M-Rite support fixed done

:cool: Got the M-Rite installed today. It was not to bad took me 3 hrs. by myself to just install the support. the track, tank were extra. Once I got it all apart I cleaned everything. On disassembly the steering hoop mounting bolt on the right side while sitting on sled, this is the top one. When removing this you must remove the nut on the inside that holds on a ground wire. Picture shows this. The kit comes with a rivet for the steering stem post lug. It is a 1/4 inch rivet and I do not have a 1/4 inch rivet gun so I choose to use the supplied bolt that that is the option. they recommend the rivet because the steering post has to clear this one in the front forward position. The bolt did hit my stem so I took my dremel tool and removed some material from the bottom of the stem and then ground some off the top of the bolt head. It then cleared by .040 or so. You also have to drill out 7 rivets and replace them with bolts. I love black RTV silicone and use it in place of lock tite now it also works great as an adhesive. So on the bottom of the support I put black RTV silicone this will act as glue between the support and tunnel and any vibrations or rubbing between the support and my tunnel will not happen. Once it was in place then the steering hoop went back on. The bracket lined up good on one side of the hoop but was off some on the other side, I just took a rubber hammer and knock it into position so it fit up tight against my steering hoop. I drilled holes into my steering hoop to rivet the support to it. Once that was done the support was in. Now reassembly. everthing went good but one other thing was the support raises up your steering stem and I have the BDX no slop stem bushing on mine, the steering post ring by the bushing rubbed on the bushing mounting lug. I just took my dremel tool and removed material were it was rubbing and then it was fine. Here are some pictures.
 

Attachments

  • xfire tear down 005.jpg
    xfire tear down 005.jpg
    82.6 KB · Views: 27
  • xfire tear down 008.jpg
    xfire tear down 008.jpg
    94 KB · Views: 30
  • xfire tear down 009.jpg
    xfire tear down 009.jpg
    93.4 KB · Views: 28
  • m-rite2 001.jpg
    m-rite2 001.jpg
    94.4 KB · Views: 33
  • m-rite2 002.jpg
    m-rite2 002.jpg
    94.8 KB · Views: 34

ezra

Well-known member
it is a nice set up I have been thinking if I dont sell my 11 this winter I would do this over the summer.lots of guys bust through at the post and my luck it would happen 23hrs or so from home.
they look like like a sweet set up.
I want to get some feed back on those valves.
I think now that u are apart this far time to find a used 10/11 head for that thing lots of turbo guys on snowest would prob be glad to swap u
 

ridehard

New member
My steering post has gained alot of strength and rigidity with this set up. It is very noticeable. It did not add that much weight. I forgot to weigh it but it was not much maybe 2lbs. Thats the problem with the weight war and the new sleds they keep cutting here cutting there and then the sleds start breaking and falling apart. This is sure not weak anymore on my sled.
Yes it is a sweet set up no more cables on the power valves. It was nice to take the 2 mounting bolts out pull the valve and take it directly to the bench for cleaning. I also talked to my dealer about the power valve and servo motor error I got and he said the servo is suppose to cycle 2 times and if it cannot open the valve it goes into safe mode. He said alot of times they keep trying to open and the servo burns out. So I might have a burned out servo but it doesn't matter I am just saying, I never had it checked because I do not need it anymore.
I will keep posting about the Supreme tool and machine valves when I can get some more miles on. I want to see what the piston assembly looks like when I take it apart at the end of the season. So far all feedback is all positive.
Whats with the head. is that how they got the extra power or H.O. for the 10 and 11? Why would turbo guys want to swap for my head? I wear out clutches now to fast I am afraid if I add more power I will go thru them faster yet. I have never had a problem with not having enough power its just that more power = more fun. :cool:
 

ezra

Well-known member
the 10 11 heads are a bit diff for more compression.
the turbo guys dont want the compression most kits want u to send your head in for reshape or buy a 7to9 head.
 

ridehard

New member
Went to Island Park Idaho for five days and gave the Cat a good beating. Pics are in guest shots The STM power valves performed great no issues, the steering stem held up great, Diamond drive worked flawlessly, clutch set-up worked great for IP went by cats recommended settings on clutch cover, I also rebuilt the secondary moveable sheave bushing that is not replaceable by cat. I bored it out and installed a bronze 660 bushing that I turned up. It worked great. Suspension adjustment recommendations fron Brett Rasmussen worked great, keeping the front arm limiter strap in stock position and loosening the shock spring on the front arm and tightening the spring on the rear arm, it allowed the sled to get up on top of the snow better by keeping the track angle to the snow low, I also put my handle bars back to the stock height position this allowed me to move forward farther on the sled when needed and I had more leverage when tipping the sled over. The bars used to hit me in the chest now they hit me in the waist area, less painfull. Later this season when I am done I will report on the STM valves again. I also have 8 hrs. of video to go thru will be posting some of that to. Any body use some easy software to work with the new go pro hero 3?
 

Attachments

  • IMG_0269.jpg
    IMG_0269.jpg
    89.4 KB · Views: 8
  • island park idaho 025.jpg
    island park idaho 025.jpg
    90.1 KB · Views: 16
  • island park idaho 010.jpg
    island park idaho 010.jpg
    94.8 KB · Views: 15
Last edited:
Top