You are using an out of date browser. It may not display this or other websites correctly.
You should upgrade or use an alternative browser.
You should upgrade or use an alternative browser.
Summer Vintage Projects 2013
- Thread starter skiroule
- Start date


skiroule
Well-known member
Good work men. It really does help keep one motivated. Hope to head up to Princeton in a comple of weeks. Have some deals I've been working on and hope to finalize up there. Passed on a good deal on a 75 Johnson JX 650 last week. It took some serious will-power but not having to move out into the shed was a prime factor in the decision.
Brad, I do have some brand-new in-the-box Polaris skis that will fit your TX that I don't know if I will use. If not, I would be willing to part with them pretty cheap. They have a slightly different tip (more like the Indy's) but otherwise are identical. If you're shooting for the pure original look you still probably want to find the ones with the more rounded tip.
For sure, my garage door does not look like yours

Well even though I can get a deal on powder coating, I did something last nite (Momma hasn't found out yet might be living in the barn!) that I been wanting to do for a while I broke down and bought a powder coat unit for at home for doin small stuff like arms and springs, and got lucky and got a oven for baking them for free, should have it set up this weekend to at least try out. In the mean time I got the pipe shot blasted and painted with 1200 degree paint turned out pretty good, starting ordering parts last night so I hope this next week UPS will drop them off before my wife gets home!

Bradzooooooo
Bradzooooooo
Just realized the painted pipe picture didn't load

Started working on the hood, decals are all stripped off and old gel coat stripped down to the fiberglass in the bad area, glad this is gonna be a rider and not a show piece, been along time since I played with fiberglass, I'll post some pics as it progresses.
Bradzoooo
Started working on the hood, decals are all stripped off and old gel coat stripped down to the fiberglass in the bad area, glad this is gonna be a rider and not a show piece, been along time since I played with fiberglass, I'll post some pics as it progresses.
Bradzoooo
skiroule
Well-known member
Dang Bradzooooo....You’re setting a wicked pace!
Since neither of us has a heated workspace, it sounds like we’re both trying to get the painting wrapped up in the next six weeks. I don’t want to repeat last year’s late fall painting experience.
I think your sled will be a lot nicer than you would have us believe.
I just used standard high temp paint on the 340 muffler last year and have been real happy about how it has held up. Certainly not a high-tech approach but the sled was ridden a lot last year and the muffler still looks good. Guess it helps to keep it out of the salt and stored in a dry environment.
Kelly, if I don't keep on it it'll never get finished, the front arms on my suspension are killing me, had a hard time getting the shafts out, the small shaft that the shock mounts too was frozen completly up and one of the bolts snapped off in it as I was taking it apart I had to heat it and soak Kroil into it to get it to move, (if you don't know about Kroil it is by far the best penatrating oil that I have ever found, its spendy but its good), so I drilled it out so I could take it out with an easy out, well the easy out broke, so I ended up making new shafts front and rear, wish they would have thought about grease fittings on these 35 years ago. I don't know if i mentioned it but my secondary was stuck to the shaft also I got that off this weekend, I got my new seat cover ordered it should be here today or tomorrow, I think you are still ahead of me as I still have to go through the engine and you are having snoluver1 do yours, maybe I should give him a call!!!!! I'm thinking if I talk to Bruce tonite on the belly pan I'll ask if he has a tank for it.
Bradzooooooo
Bradzooooooo
Oh boy. There starting to back up at the first tee now. If this keeps up, I might have to actually start charging you boys! Lol.
By the way Skiroule, I haven't had time to sit down and wright another "state of the engine address", but motor #2 was in much better shape!!!! I got the crank and cases off to "my guy" last night. I'll give a detailed report as soon as I hear back from him. He's pretty busy with bike stuff right now, so not sure about the time table, but he should be able to squeeze us in without too much delay.
By the way Skiroule, I haven't had time to sit down and wright another "state of the engine address", but motor #2 was in much better shape!!!! I got the crank and cases off to "my guy" last night. I'll give a detailed report as soon as I hear back from him. He's pretty busy with bike stuff right now, so not sure about the time table, but he should be able to squeeze us in without too much delay.
skiroule
Well-known member
had a hard time getting the shafts out, the small shaft that the shock mounts too was frozen completly up and one of the bolts snapped off in it as I was taking it apart I had to heat it and soak Kroil into it to get it to move, so I drilled it out so I could take it out with an easy out, well the easy out broke, so I ended up making new shafts front and rear. Bradzooooooo
I know it's not polite to laugh at other's misfortune but having gone several rounds with a rusted shaft on a 72 Colt, I still had to smile at this. In my case, the shaft was not only rusted but slightly bent. If would move about one inch either way and seize up. I can't remember exactly how I got it out but I think it involved a very large hammer.
By all means, if you ever do need any engine work, get in touch with Adam (Snoluver1). He's really not all that hard to deal with. He just seems that way.
motor #2 was in much better shape!!!! I got the crank and cases off to "my guy" last night.
Keeping the fingers crossed. Maybe we'll have a rippin' 440 yet.
Well I had 2 years of auto body 35 years ago in votech so I pulled everything I could remember about fiber glass repair which was a lot harder than it sounds (remembering that is)
1st I remover the decals with a heat gun to get to the damaged area
View attachment 41205
Then I sanded the damaged area through the gel coat to the bare fiber glass
View attachment 41206
I cut out the bad area and ground out the spider webbing with a dremel tool then laid fiber glass mat and resin in from the inside, when that was done I did the same on the outside I didn't get any pics of this as my hands looked like they were tarred and feathered with fiber glass so all I have it the finished product
View attachment 41207
Next I sanded the fiber glass and covered it with a layer of body filler once this is hard I will sand it down get the low spots filled and the body lines back this will probably take a few coats, I'll take more pic's as it progress's, I know I probably did some things wrong but this was the best that I could remember, if you can buy an after market hood by all means do it unless you have a lot of time on your hands sorry this is so long.
View attachment 41208
Bradzooooooooooo


skiroule
Well-known member
Every time I work with fiberglass I think of Chevy Chase and the tree sap in Christmas vacation.
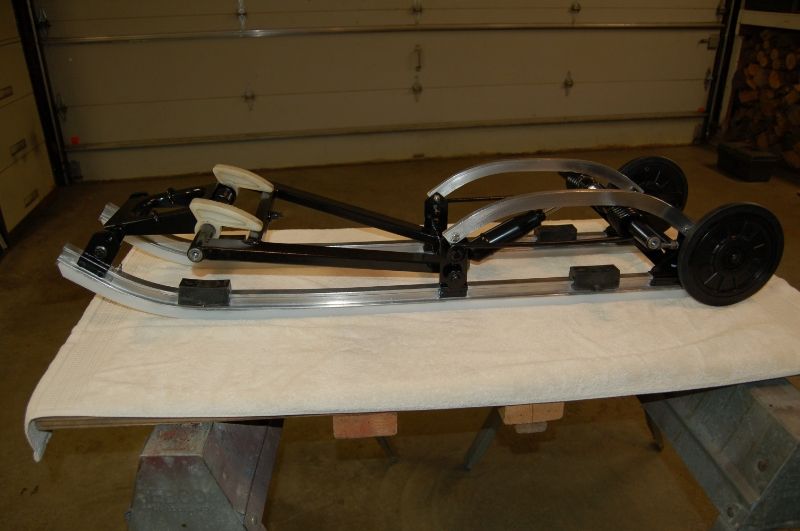
Got the skid put back together. It's not fancy but it's functional and will give me the full 4" of travel (if I ever need that much).
It will work OK for this winter but there are a couple of things I would like to replace. If I find them before it gets installed I'll swap them out. Will see if my trip to Princeton produces anything besides Bratwurst indigestion.
D
Deleted member 10829
Guest
I think that looks very good!


skiroule
Well-known member
Decals are a plus but it really looks good. I guess the schooling sunk in. I'm looking forward to seeing it in paint. Mr. Mark, almost no 250's listed. Starting to think that is one rare sled.
I've been doing a little horse trading with Bradzoooo and I got these two gems from him today. These are two items that are highly susceptible to breakage and/or decay but the ones he sent me are in excellent condition and I'm lucky to get them. A new pad emblem comes with the decal kit so the pad will look brand new when it goes on the sled.
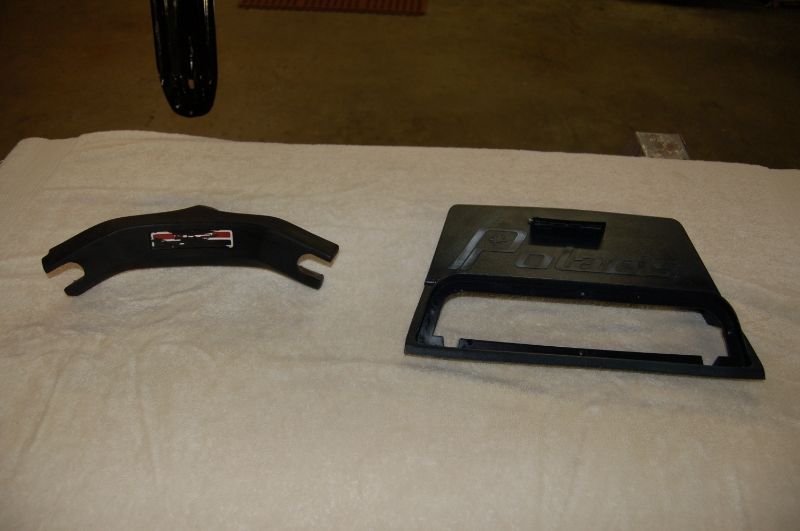
I've been doing a little horse trading with Bradzoooo and I got these two gems from him today. These are two items that are highly susceptible to breakage and/or decay but the ones he sent me are in excellent condition and I'm lucky to get them. A new pad emblem comes with the decal kit so the pad will look brand new when it goes on the sled.
Kelly, glad we can help one another out, this is turning into quite a project, I have to thank John Dee because of all the great friends that I have made on this site over the past ten or so years, its nice to know other people out there have the same passion for sledding and without this site I would've never had the chance to meet them.
Bradzooooooo
Bradzooooooo
I have to say that I'm really impressed with this powder coat system makes me wish I had a bigger oven. You coat the part which takes anywhere from a minute to 3 or 4, get your oven at 400 degrees, put the parts in for 15 minutes, take them out let them cool, you get a nice hard high gloss finish in a 1/2 hour with no runs or fumes, the gloss black I'm using now is good for a 1000 hours of continuous salt spray so I think I'm good. I really didn't get much done this weekend with the race in town and a family picnic yesterday. Kelly I'll let you know on the trim its not like I'm gonna need anytime soon.

Bradzoooo
Bradzoooo
Last edited:
skiroule
Well-known member
The powder coat stuff looks great! Guess I'll have to see the light and move into modern coating technology.
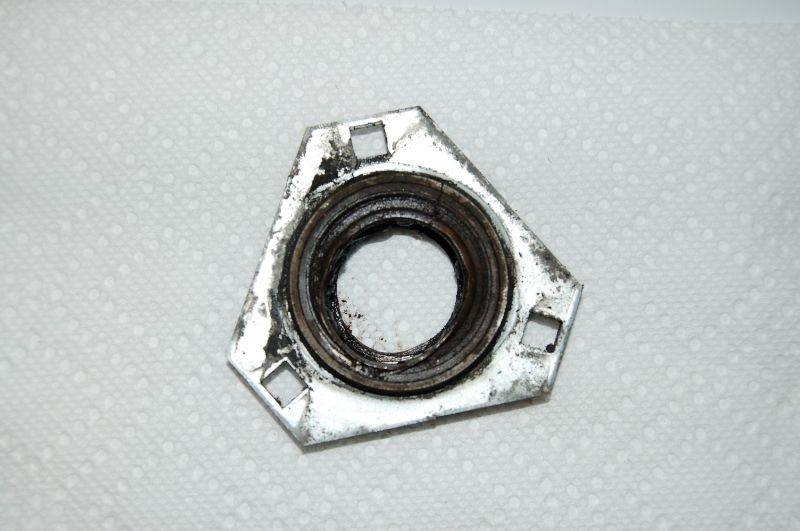
I finally beat the chaincase into submission and it came off, which paved the way for some badly needed progress, including driveshaft and track removal. When I pulled the driveshaft mounting assembly on the clutch side apart, the bearing didn't look quite right. This is what was left of it. I don't think this would have made it very far.
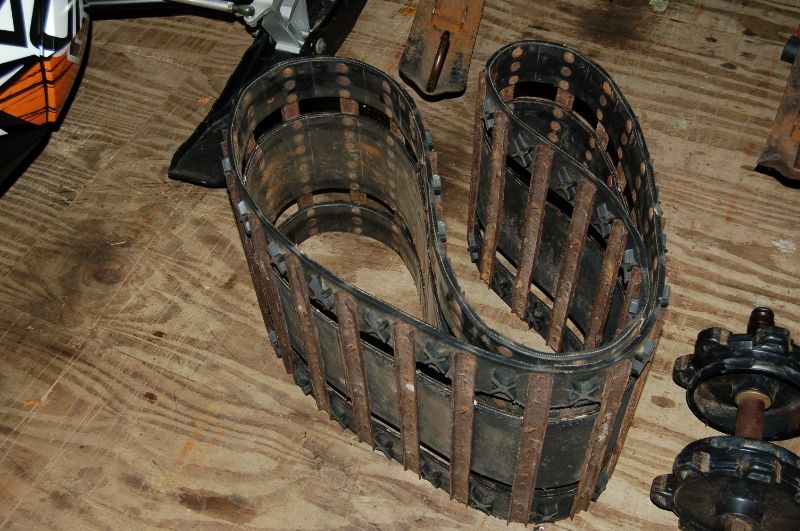
With the track off, I got a good look at it and was pleasantly surprised to find that it is in pretty good shape and very usable. There's only a few small edge cracks on the inside rubber. Otherwise the belts look good. There's the usual two or three slightly bent cleats but nothing major and there are no broken or missing rivets. After the first couple of rides I'm sure I'll have to replace some rivets but for now, it's good to go.
The drivers don't look real bad (I've seen much worse) but there is some wear so I'll have to make a call at some point whether to look for replacements or not. Also got the jackshaft out, tank out, and seat off.
After some long overdue progress and with the heat/humidity, the post work session beverage(s) tasted pretty good.
I finally beat the chaincase into submission and it came off, which paved the way for some badly needed progress, including driveshaft and track removal. When I pulled the driveshaft mounting assembly on the clutch side apart, the bearing didn't look quite right. This is what was left of it. I don't think this would have made it very far.
With the track off, I got a good look at it and was pleasantly surprised to find that it is in pretty good shape and very usable. There's only a few small edge cracks on the inside rubber. Otherwise the belts look good. There's the usual two or three slightly bent cleats but nothing major and there are no broken or missing rivets. After the first couple of rides I'm sure I'll have to replace some rivets but for now, it's good to go.
The drivers don't look real bad (I've seen much worse) but there is some wear so I'll have to make a call at some point whether to look for replacements or not. Also got the jackshaft out, tank out, and seat off.
After some long overdue progress and with the heat/humidity, the post work session beverage(s) tasted pretty good.
Thanks Kelly, man that stuff is hard dropped a piece putting it together and it never even made a mark on it, I was reading that Rocky the flying squirrel rebuild the other day and Larry said he had to melt one of the shafts out of the rear suspension on that RXL, you know I was really thinking about that when I was trying to get that shaft out of mine, and now I see someone has done it doesn't make me sound as crazy as I thought I was. I almost drilled the tubes and made grease zerk blocks to put on them and then I got to thinking if this sled see's a 100 miles a year it will be doing good so I left it stock and antisiezed the crap out of the shafts, and will just tear it down after the season and antisieze it again. This heat and humidity is killing me on working on this hood, by the end of the night I look like a cross between the Pilsberry doughboy and swampthing, as of last night i think I'm down to my final sanding tonite.
I think that bearing has a couple good miles left in it, at least your track has all good cleats I'll have to replace at least 3 of mine.
Bradzooooooo
I think that bearing has a couple good miles left in it, at least your track has all good cleats I'll have to replace at least 3 of mine.
Bradzooooooo


