The Namesake

skiroule

Well-known member
Gary, it's definitely a "rider forward" design. Wind protection seems a little lacking but maybe it never went fast enough.

I think I remember Indian Head. Think it was pretty much the same as the Permatex version. With the little dip brush, it wasn't the most precise application system.
I don't have a answer for you on the brown case sealer Kelly, but my guess is somebody used whatever they thought would work. I have heard that the sealants back in the day weren't always effective, heck maybe someone used plumbers sealer on it! I guess it gives a clue that someone has been inside the motor before for repairs, but it could have been 30 plus years ago.

When you're sealer arrives, the trick is to use enough to get the job done, and not have excess squeeze out INSIDE the case and just hang off the surface where it can eventually fall off into a running engine! A little is okay, just don't go overboard and make it ooze out everywhere.
Thanks for the advice on application. It confirms what another fellow told me, although he didn't explain why having ooze inside the engine was a bad thing.
I'm convinced the bottom end has been apart. Looks probably don't mean a lot in terms of how well they are working but the seals look way too new to be original. I'm guessing they also took the case apart but apparently the fix wasn't very well done if it's still leaking. Since the "practice motor" didn't have any sealant, I'm thinking they came from the factory without any but maybe over time even the most minor warping or distortion creates a need for a little help to get an air-tight seal.
 

gary_in_neenah

Super Moderator
Staff member
Let's call this one "The Ghost of Christmas Past" as you brought another one back from the dead. Congratulations Kelly!
 

skiroule

Well-known member
Thanks guys, it is a bit of a monkey off my back. Could do some minor tuning but think it’s very ride-able as is.

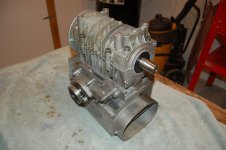
After I put the case back together it occurred to me just how compact these old motors are when they’re stripped down to the basics.
DSC_0065_1.jpg


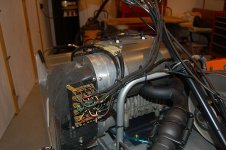
Got everything plugged into the electrical board so it should be a functioning sled electrically.
DSC_0063_1.jpg


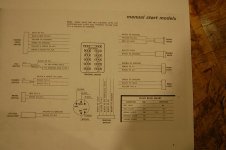
The internet can be a real wasteland but I’m not sure where else you could come up with the exact wiring diagram for an almost 50-year-old snowmobile.
DSC_0069_1.jpg


With the engine now running, the work pace should be “balls-out” from now on until the project is finished (which, I learned is an early steam engine term and not the immediate image that comes to mind).
 

kirk600

Active member
I use the internet to get my parts to fix cool old sleds. And check John’s snow forecast!

Looking great Kelly always nice to get a wiring problem sorted out
 

gary_in_neenah

Super Moderator
Staff member
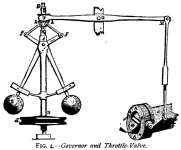
Kelly's correct, "Balls Out" is an old Steam Engine term. In snowmobile language, "Pinned to the Bars" might compare. As the illustration shows, the faster the balls/governor spin, centrifugal force causes them to spread out horizontally and further opening the throttle. Whatever you're riding, steam engine or otherwise, if you're "Balls Out" you're going about as fast as she goes.

Balls Out.png
 

euphoric1

Well-known member
Kelly, are you confident where you started with your jetting on the mikuni carb? I know once you put it in the snow it will be trial and error, I did the conversion in my younger years in a Mercury 440SR with a kohler engine in it, once it was all dialed in it was like a completely different machine. My first sled had a Walboro WF carburetor on it and I'm surprised I didn't strip the screw holes out from taking it apart so many times. But as young as I was I was just happy to have my own sled even if I worked on it more than I rode it, plus I blame my first sled for leading me down the path to the career I chose in life so I do at least owe it that. You are truly a master at what you do and I thoroughly enjoy your postings and wondering if there is another project working its way up the pipeline.
 

skiroule

Well-known member
Gary, it's pretty funny that I learned about the true definition from a former female co-worker. Can’t remember how it came up in the conversation though.
Kelly, are you confident where you started with your jetting on the mikuni carb? I know once you put it in the snow it will be trial and error,

I’m confident that I have a decent starting point but probably not the final answer. There are still a few things I want to check as it sits. When it comes to actually riding it, you’re right about the trial and error part. I think I’m on my 4th set of jets on the Chaparral and there’s still some room for improvement. I don’t want to run them on the hairy edge, just be fairly clean through the throttle range.

As far as future projects, I might have had one if I had pulled the trigger on the ATX last summer. At this point I have no clue but you never know what will come up unexpectedly. It would be nice if I could finish one in less than two years but that seems to be my pattern.
 

skiroule

Well-known member
I use the internet to get my parts to fix cool old sleds. And check John’s snow forecast!
It’s true, these sleds would be a lot harder to rebuild without internet sources. FB gets its share of criticism (and justifiably so) but the brand-specific vintage sled groups are a great source for information, parts, and entire sleds. Occasionally, unexpected parts finds will even show up on ol’ eBay. In fact, I’m waiting for an item from there now.

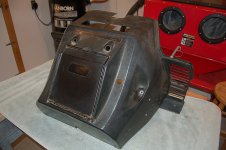
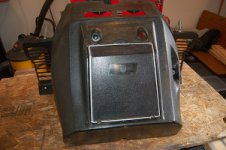
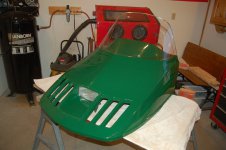
This will be the next area of focus: The console, engine cowling, or whatever the correct term should be (I call it a console). The outside just needs a good cleanup, some plugs for the holes that won’t be used, repainting of the door stripe, and new decals – have to get that Coleman logo on there :).
DSC_0066_1.jpg

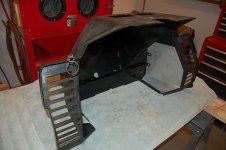
I did some extensive (and somewhat crude) modifications on the innards of the console. Inside were a bunch of plastic panels that provided a small, goofy cubby hole to put things in so they could bounce around on the tunnel but the main accomplishment was that they also helped trap engine heat – something these sleds didn’t need. I eliminated most of the panels but kept enough of one panel to provide a mounting point for the clutch guard. After cutting most of that panel off, I reinforced it with a piece or aluminum and called it good.
DSC_0065_1.jpg
 

skiroule

Well-known member
Merry Christmas morning folks! Getting back in the shop after taking a few days to help my son with a project.

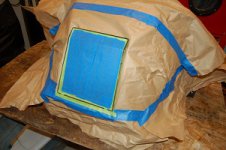
This is a whole lot or masking for such a little accent stripe but I hate cleaning up overspray. Also got the hole plugs and the lower attachment hooks installed and will give the whole thing a final clean and polish once the decals are on (they are supposed to be here Monday). Then I’m calling this piece finished.
DSC_0069_1.jpg DSC_0076_1.jpg
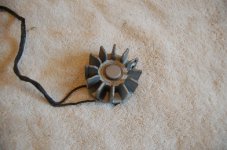
This was in a pile of parts and it had me scratching my head until another RTX owner told me that it’s the voltage regulator. The wiring diagram showed that the sled had one but I had no idea it looked like this.
DSC_0078_1.jpg
 
D

Deleted member 10829

Guest
Another masterpiece near completion! Well done Kelly! Can't wait to see the final pics. Merry Christmas!!
 

skiroule

Well-known member
Thanks guys, it was a very laid-back Christmas day, just the two of us, two dogs, and a small herd of “pet” deer.

With the console close to finished, I decided it was time to dust off the hood/windshield from the parts sled, which was actually the better of the two, and get started on it.
I changed my mind about not removing the hinge assembly and did remove it for blasting and paint. The assembly mounting points on the hood are plastic and are notorious for being fragile. One wrong move prying the clips off and they will snap like a matchstick, but the assembly came off OK.

After removing the original hood graphics, I hit the windshield and hood with some scratch remover, polish, and a final shine product. The hood has it’s share of battle scars that will never come out but I guess that adds character. It will be fine for this project.
DSC_0075_1.jpg

Along with the console decals, the new hood graphics should arrive Monday so hopefully they can go on next week.
 

kirk600

Active member
Sure looks like a pickle(Skiroule) to me! glad you're making some good progress Kelly, I am so happy you are able to enjoy the shop time again..... and I am sure others feel the same way.
 

skiroule

Well-known member
Sure looks like a pickle(Skiroule) to me!
I guess I can see the resemblance. After all, I think the official name of the color is “Gherkin Green”:). I’m kidding of course, but it’s probably no surprise that after Coleman bought the company, Skiroule sleds would eventually be rolling off the line painted Lantern Green. Funny thing is, I can’t imagine this sled being any other color now.

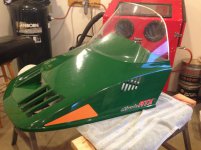
Got the hood graphics applied (decals is probably a better word). Really happy with the quality and ease of application, although it was a little tricky removing the facing paper from the lettering without pulling the decal back off the surface.
IMG_1314_1.jpg
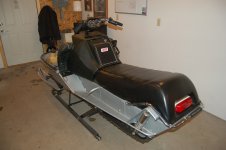
I did another test run with a functioning tach and found that it was idling about 2800 RPMs but after more carb adjusting, I got it down to a steady 1800 which seemed good to me. I personally like them idling a little high versus too low. Once the carb was more or less dialed in and easy access was no longer required, it paved the way for a bunch of other things to be installed. It’s starting to resemble a snowmobile.
DSC_0083_1.jpg
 
Top