One Man's Trash

D

Deleted member 10829

Guest
That is a cool find! Like you said, can't be many of those around. Nice touch for your project!!
 

skiroule

Well-known member
Wow, it’s been a while. Have been working on the hood some when I can squeeze it into my “busy” schedule.

I will never have the title of master plastic welder but I was able to get to the point that I could weld the various cracks in the hood (think there were five overall). The welds seem plenty strong so it should be as good as new. Eventually I sanded and finished off the welds with “Multi-Fix” plastic filler, which bonds very well to the ABS plastic of the hood and welding rod.

DSC_0508.JPG


The outside hood finish still required quite a bit of sanding/filling. There were a lot of spiderwebs in the paint that had to pretty much be sanded down to the base plastic. Looking at it now, the original paint process was pretty interesting. The painters first laid down a coat of top color and then shot a second layer of bright metallic gold. Then the final finish coat of color was sprayed on this gold base. I suspect that this gave the final color a lot of depth.

One more pass with 400 paper and it’s on to primer. Hoping to have the hood, pan, and clutch guard painted by the end of June. Won’t go to the lengths that the factory did but it should look OK.

DSC_0607.JPG
 

skiroule

Well-known member
It’s a smoky summer Saturday in northern MN so seems like a perfect day to post some snowmobile stuff.

Gary, I used to have a habit of wandering off into the woods until my wife discovered the effectiveness of a shock collar. Still twitch when I hear a bug zapper go off.

Welded the cracks on the dash/engine cover. Wasn’t too concerned about finishing on the inside because the welds can’t be seen from any angle once it's installed. Really can’t do much more with this until I get the engine and carbs mounted, as I don’t know if the Mikuni’s will require some dash mods for clearance.

DSC_0650.JPG
IMG_0911%255B1%255D.JPG
DSC_0652.JPG


After a few weeks of soaking with Chem-Dip, the sludge, varnish, and other unknown chemicals in the bottom of the reserve tank cleaned out beautifully. Will need some new fittings but it shouldn’t be too hard to find something. I plan to just use a plug on one because the return line won’t be required.

IMG_0909%255B1%255D.JPG


Hope to have some news on the paint soon, there’s been a slight change of plans.
 

skiroule

Well-known member
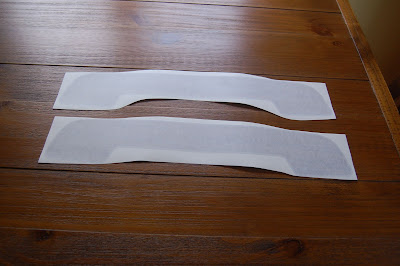
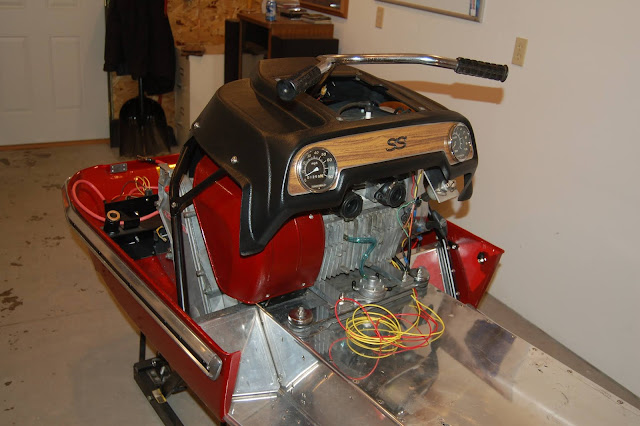
The subject of this photo will be more impressive after installation but it ties into a previous post and I wanted to acknowledge a business that made an extra effort to help me with this project.

I needed a new dash decal but there were a couple of complications: First, I only needed the dash decal and not the rest of the decals that come with a full set, as this sled had none of the other factory decals. Second, because the switch had to be re-located to accommodate the tach, the decal shouldn’t have the switch position graphic, as part of it might not be covered by the tach frame.

I contacted “The Sled Printer” out of Slinger, WI (https://www.sledprinter.com/), since they were the only source that advertised the full Chaparral decal sets. I’m sure they would have rather sold me an off-the-shelf set but not only did they agree to sell me an individual decal at a reasonable price, they offered to make a special run to print it without the switch position graphic. They made the print run and I had it in four days. Pretty rewarding to find a business with this kind of service.

Since I’ve been known to screw things up, I ordered two.

DSC_0722.JPG
 

skiroule

Well-known member
I had planned to do the hood/pan painting myself but process took a little different turn. A local body shop guy, who is a street rod/rat rod enthusiast, found out that I had a 35 Ford slantback sitting out at the original family farm. He wanted to make a deal and since it’s been sitting in a shed since 1976, it occurred to me that I might never get to it.

He offered to spray the hood/pan, in addition to kicking in some cash for the Ford so I took the deal. I had the parts all prepped but the only problem was, he’s basically a one-man operation so it took a few weeks for him to get to it.

I wasn’t really trying to duplicate the original color but the color I picked is eerily close to the original. He did a great job and the paint came out well. I can honestly say that in this case, the photos don’t do it justice. I really like this color.

DSC_0760.JPG


DSC_0763.JPG
 
D

Deleted member 10829

Guest
That color does look nice. Can't wait to see the finished product!
 

skiroule

Well-known member
As the calendar blew past two years on this project this summer, I'm with you guys on wanting to see the project completed. I figure I have to do what it takes this fall to get this sled on the snow this winter.

Having the pan paint finished should break the log jam of stuff that depended on it being installed first.
 

mezz

Well-known member
As usual, perfection at it's best! I really like the color too, it's darn close, but yet a step above. She's a beauty, can't wait to see her all put together. -Mezz
 

skiroule

Well-known member
Thanks Mezz – My summer distractions are such that I don't work in the shop a whole lot but the Canadian geese are starting to flock up. That can only mean one thing….winter is on the way.

I did mount the pan hardware and bumper and applied the heat reflective tape so the pan is ready to be joined with the chassis. My old iphone doesn’t do the best under floodlights so the color has sort of a rose tone in this photo, not a good representation.

IMG_0928%255B1%255D.JPG
 
D

Deleted member 10829

Guest
That sled will be more shiny and clean than when it was new! Coming together very nicely.
 

skiroule

Well-known member
No doubt I like shiny.

Motor is now bolted down and a couple of other items installed, including exhaust. The white paint will probably be replaced by a more practical silver but I'll keep it until I get it firing again. Guess I just think it looks cool.

DSC_0774.JPG
 

skiroule

Well-known member
Figured I’d better check in again as proof that the project hasn’t been abandoned. Believe it or not, the pace of the work has actually picked up somewhat over the last couple of weeks.

Been working on the wiring, which was an electrical Scotchlock nightmare. Both harnesses basically had to be rebuilt. Also mocked up the dash and confirmed that there would be no interference with the Mikuni carbs.

Had to blast and paint a second dash frame, as I assumed that all 72 dash frames were the same so I just grabbed one off the pile and refinished it. Not so, the SS frames have an extra set of brackets for the dash supports. Details, details.

Stumbled across a new “old” belt that was still in the original sleeve, which was pretty cool. With the belt and clutch guard installed, the drive setup is complete.

DSC_0856.JPG
 

skiroule

Well-known member
Appreciate the vote of confidence Mr. E.

With the exception of the tail lights and kill switch, the wiring is all but done. The good news is that even after my meddling, the engine still has good sparky-spark, so with fuel it should fire up. Hoping this will happen by Thanksgiving.

After a couple of weeks of ordering/re-ordering and two failed attempts, I finally got a black vinyl paint that looked more like the original black. This stuff isn’t available locally so all a person can do is order it, try it, and keep trying.

My wife liked the all-black look of the dash housing better and I’m thinking she may be right but I decided to go with the original look first and use the wood-grain decal.

DSC_0860.JPG
 
Top