Polaris Mutt Mod

skiroule

Well-known member
a little paint and that looks greatšŸ˜‰
At first I thought it would just buff out but then I figured it maybe needed paint.

It's amazing what the condition of the idlers are in just like the track bands are. It's too bad that things can't be made to last as long anymore, or, should I say, aren't made to last anymore. Like I said in my previous post, the magic man strikes again.
Itā€™s not always the case but more often than not Iā€™m amazed at how well some of the parts on these old sleds have held up. Not only did these sleds put on some hard miles but a good share of them ended up sitting in a field for 30 ā€“ 40 years, exposed to whatever mother nature could throw at them.

This is the final piece of the puzzle with regard to the ā€œunder tunnelā€ running gear. Track, suspension, and driveshaft are all finished. Now I anticipate spending an extended period of time doing metal work on the bare chassis. I wouldnā€™t be shocked if it takes a month or more. It needs a lot of love. Iā€™ll try to work in other things if for some reason I have some down time on the chassis.

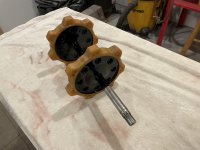
Can't really get the light colored drivers totally clean but as I mentioned in an earlier post, they have surprisingly little wear.
IMG_1859_1.jpg
 

euphoric1

Well-known member
skiroule... you are truly a master at your craft! ... WOW!!! unbelievable the caliber and quality of work you do! I love the progress text and photo's and even after seeing some of your resto's I'm still floored by your work! UNBELIEVABLE!!!
 

kirk600

Active member
Looking good Kelly, the rear suspension looks really nice with the red rails, and new plated hardware. Keep up the great work!
 

skiroule

Well-known member
I know Iā€™ve said this many times before but Iā€™ll never claim any special ability. I have no doubt that there are many of you on here that are far more skilled around the shop. I will say that a person has to be willing to put in the time and Iā€™m fortunate that Iā€™m able to spend a lot of time on these projects.

Sorry this got a little long but I thought Iā€™d devote a little space to where things may be headed rather than what has been done. One ā€œmutt modā€ thought that came to me almost by accident is to replace the original rusty steel tank with a later model poly tank

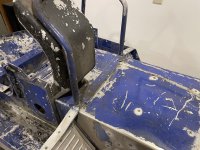
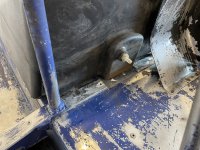
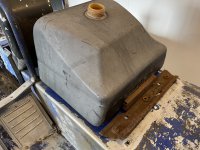
I found a good poly tank off a 74 TX that I thought wouldn't look like an afterthought on the sled but the mounting system is completely different. The first mod I had to do is get rid of the flange that held the original tank on in front and cut out a section of the cross strap so the tank will lay flat on the tunnel. The remaining strap material should still be more than strong enough. Fits much better now. Iā€™ll eventually have to make a retainer setup to hold the front of the tank in place.
IMG_1858_1.jpg IMG_1871_1.jpg

The rear tank bracket is also different and sits further forward so it will require making some new carriage bolt holes to fasten the bracket. Shouldnā€™t be a big deal (I hope).
IMG_1869_1.jpg

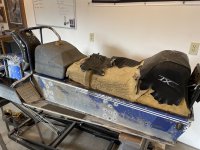
If I decide to stay with the 73-style seat I could probably get by with just moving it slightly forward but what I would really like to do is add a little length to the seat and while Iā€™m at it, add a couple of inches of height. Think it would add a little comfort and look pretty cool. This would require a somewhat custom seat cover but I got a firm yes from my upholsterer friend when I asked him about making a seat cover. This is how it mocks up as it currently sits.
IMG_1867_1.jpg
 

kirk600

Active member
Kelly,
That looks really good with that tank and seat combo. I noticed how the foot wells make this more of a sit back and enjoy the ride type of sled...... you can't really slide forward so you need the seat/tank junction to be comfortable as you lean over to turn. The tank will definitely help you do that and hopefully not bruise your legs like that metal tank will. That's the same tank oval racers use on the later TX's if they have to run OEM tanks...... keep up the great work
 

skiroule

Well-known member
Great observation Kirk. This is a small sled. Iā€™m not all that tall but when I sit on it with my feet in the foot rests, Iā€™m all the way back on the seat. As you said, I think the taller tank will give the sled a better feel in this riding position and will give the profile of the sled a little more balance.

Two thoughts on the matter. What would these old sleds say if they could talk?
Or how about the people that built them? A young pup on the line back then would be pushing 70 years old now. Bet they'd be thrilled to see this!
Gary, I think about this all the time when I take a close look any of these old sleds. No doubt, a lot of them would have quite a story to tell. On this sled, the tie rods were so bent they rubbed against the frame hard enough to enlarge the frame openings. I canā€™t imagine what this thing was like to steer when you had metal grinding against metal every time you turned the handlebars. Did it keep people from riding it? Nope, they were probably having a blast, maybe going in a straight line a lot.
IMG_1886_1.jpg

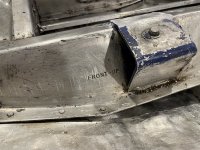
I got a chuckle out of this. Keeping in mind that there arenā€™t a lot of parts to this chassis, the company still felt the need to stamp ā€œFRONT UPā€ on the cross member. Maybe there was that one guy who, after a long night of bowling the night before, had some problems figuring out which way to weld it onto the frame.
IMG_1887_1.jpg

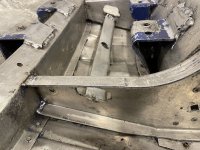
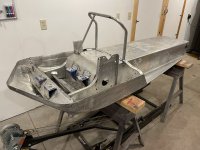
The chassis is basically down to bare bones and the first paint stripping pass is done. It will need more cleanup but itā€™s a start. Iā€™ve purposely left the paint on the engine mount blocks because, as dumb as it sounds, the paint marks will provide a good starting reference for the position of the motor plate I have to build.
IMG_1880_1.jpg
 

skiroule

Well-known member
Hey,,
Are you Ice fishing err what??
Your suspicions are justified but no. Worked a few days last week and then took a four day trip to the Twin Cities so just got back in the shop today. Things are happening but nothing at a point that is update-worthy.

Since I don't have a diagram and it was all in pieces, I have spent a little time figuring out how the drive axle/chain case setup all goes together. Not terribly complicated but I want to make sure I have every collar, washer, spacer, and clip for when I put it together for real.
 

skiroule

Well-known member
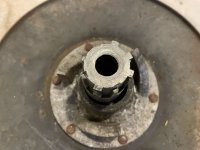
By now youā€™d think Iā€™d be used to some unpleasant discoveries but for some reason Iā€™m still sometimes a little surprised when things are in worse condition than I expected. I decided to tear down the secondary clutch to clean it up and made this discovery:
IMG_1903_1.jpg
About half of the spline ends were snapped off the shaft. This wouldnā€™t affect the actual drive action but there is a grove machined in the shaft for a clip that holds the whole thing together and the spline ends keep the clip in place. Not sure how much longer this would have held together.

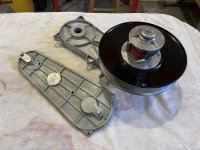
So it was the old Colt carcass to the rescue again. The chain case was changed somewhat by model year 75 but the secondary clutch is identical to the 73. The fixed sheave was a little pitted from rust but the shaft spines were in great shape. I actually ended up using everything from the Colt clutch but the movable sheave because the other Colt stuff had less wear.

Still like the look of the cast chain case cover.
IMG_1896_1.jpg

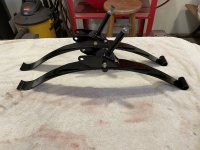
Also spent a little time assembling the front springs/spindles. If this were a true show sled, Iā€™d be spending a lot of time filling in the pitting on the springs but itā€™s not so Iā€™m OK with the way they look.
IMG_1904_1.jpg
 

skiroule

Well-known member
Thanks Mark, Iā€™m getting into uncharted waters in the next 2 ā€“ 3 weeks where Iā€™ll be spending a lot of time for what seems like not much in the way of results.

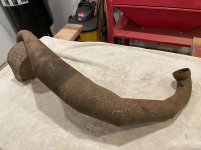
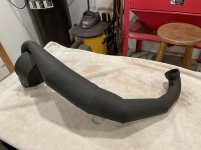
I picked up this pipe on one of my parts runs with the hope of using it on the mutt. Itā€™s a factory single ā€œtunedā€ pipe/can setup out of a 74 TX. The fellow didnā€™t really want to part with it so he shot me a price he figured Iā€™d turn down. Think he was a little disappointed that I met his price.

The pipe will fit the chassis (barely) but the Y-pipe on the motor Iā€™m using will have to be modified to line up. Iā€™m hoping the pipe will work with the 79 340 and it wonā€™t run like crap. Iā€™d prefer to not have to go to Plan B (or C) on the exhaust.

It was a whole lot of blasting, sanding, and more sanding to get it to this point and I can probably get my money out of it if it doesnā€™t work out but this pipe seems more in line with the project.
IMG_1697_1.jpg

IMG_1915_1.jpg
 

skiroule

Well-known member
Happy New Year! Beautiful frosty day in northern MN today.

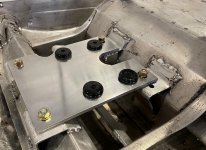
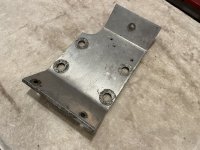
Iā€™ve been spending a lot of time on what I consider a tricky part of the project, which is nailing down the motor placement. This is obviously critical for clutch offset and shaft spacing. Using my homemade offset tool and a lot of measuring I was able to get things close enough to fabricate the motor plate. A skilled machinist will smile a little at my effort but weā€™re talking about a simple man with simple tools here.
IMG_1923_1.jpg

If youā€™re curious, this is what the original motor plate looked like when it was installed in the 79 chassis. Itā€™s not even close to the 73 version.
IMG_1924_1.jpg

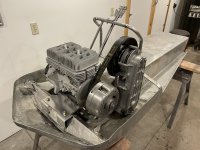
I did a bolt-up test of things tonight and the measurements were surprisingly close to the mock-up right out of the gate and I do have some room to really tweak things if needed. I slapped an old belt on it just for fun and the fit actually looks pretty good. Iā€™m just using the stock clutch for checkout, kirk600 is helping me with a clutch upgrade down the line. Still a few modifications needed and the exhaust connection needs to be figured out but then I can tear it down and start some serious metal work on the chassis.
IMG_1944_1.jpg
 

rph130

Well-known member
That is going to be a work of art when you are done and something I would be really proud of. Can't wait to see the continued progress and completed project.
 

kirk600

Active member
Hi Kelly, that looks good sitting in there..... but I have a question?
Is the belt going to clear the fins? The reason I ask is as your speed increases and the belt rides up towards the top of the primary clutch, the angle of the belt might interfere with the fins on the cylinder.
On the later TX's the belt doesn't go uphill, between the two clutches....
My rough measuring, at full shift out the belt will probably be 3/4" closer to the cylinder than at the starting point. I measured the comet clutch I have here.
Hopefully you have the room for this measurement Kelly
 

skiroule

Well-known member
Kirk, itā€™s funny you should mention the belt. I put the belt on just as a sanity check and Iā€™m thinking oh-oh, itā€™s going to hit the fins. Donā€™t think it will take a lot of trimming but Iā€™ll do some marking before I pull it back apart. Think your number is right on.

Wide open throttle is bound to be a scary deal besides the belt thing.
Time will tell how long Iā€™ll dare ride this thing at wide open throttle. These sleds give you a whole different perspective on speed.

That is going to be a work of art when you are done and something I would be really proud of. Can't wait to see the continued progress and completed project.
Thanks! I think the key word is ā€œdoneā€. I keep coming up with little mods Iā€™d like to do, all of which add time. This is a good example of what Iā€™m talking about.

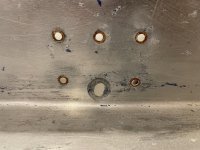
Egged-out suspension mount holes are a common problem on these old sleds.
IMG_1957_1.jpg

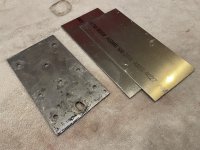
A lot of guys just pull off the backing plate, flip it over, re-rivet it and drill a new hole in the plate. The other day, it hit me ā€œwhy not lower the mount point below the running board, like some of the later year models?ā€ This would drop the suspension about an inch or so and probably add a couple of inches of height at the rear of the sled. Not a lot but would give the sled a bit more forward rake.

So I cut a couple of new, longer plates out of 6061 aluminum. This aluminum is very strong but Iā€™m still going to add an ā€œLā€ bracket to fasten to the running board to add some lateral strength. Also, the bottom of the plate will be trimmed to a more triangular shape to give it a better look.
IMG_1960_1.jpg
 

skiroule

Well-known member
Hey Kelly, I thought of you when I ran across this item. Something every Vintage Shop should have!

View attachment 67712
Gary, that has to be the funniest thing I've seen in a long time. We do some small engine work at the store and I told the guy that does most of the wrenching about it and he just cracked up. So that was the line we used all afternoon, no matter what the job.

I think I need at least a case.
 
Top