Well guys, as I mentioned at the start of this project, it would challenge me to try some new things and the metal work is a good example. I’m not fast but I’m learning some things about what will work for me and what won’t.
I figured I had to bend it on the frame to get the curve right. After making sure it was square on the frame, I Used a bunch of clamps to hold the top section in place and slowly hand-forced the lower section towards the frame (using a strap to hold it) until I could draw it completely into the frame with C-clamps and 2x2’s. Then I heated the bend up pretty good with a MAPP gas torch. It will need to be pulled in a little when I rivet it in for good but it won’t take much effort.
The 79 motor Y-pipe is basically horizontal and doesn’t work with the 75 tuned pipe or the 73 chassis so I cut the Y-pipe off, salvaged the flange and, after several failures, finally got an angled section of pipe cut right. Then I got it all mocked up together to make sure it would hook up to the tuned pipe and since I don’t have the equipment or know how to weld, I went to the local body shop guy to have him weld it up for me. Deer are keeping him really busy so it took him awhile to get it done but he was nice enough to squeeze it in. It all fits together now but it’s tight.
View attachment 67797
The major under-hood stuff is now fitted so I can tear it down and get serious about pan/tunnel repair. That will keep me occupied (and quiet) for quite a while
I did a little further refinement on the hood opening tonight. Since this motor puts the Y-pipe closer to the hood I decided to cut a “V” in the front, similar to the hood on the triples, to help dissipate the heat a little better. Also cleaned up the rest of the cuts. Think I’m calling the cut-out ready for filing and finishing work. Lots of work to do on the rest of the hood though.
View attachment 67798
P.S. Hoping you’ll post some info on your racing week and maybe some photos?
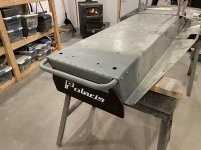
On an unrelated note, this little mule was literally dumped off in my driveway last weekend: 1970 Polaris TX 300 Playmate – one year model with 213 miles on the odometer. Has spark so it should run. I just couldn’t pass it up. How can you say no to a Playmate?
View attachment 67799


 and the 1972 hood. I wish I had the skills to bend aluminum like that
  .
.